The Ninja Creami has revolutionized the way we make ice cream at home, offering a convenient and efficient way to create delicious frozen treats. With its innovative technology, this appliance allows you to transform simple ingredients into creamy masterpieces in no time. The Oreo Ninja Creami recipe stands out as a fan favorite, combining the classic appeal of everyone's favorite cookie with the versatility of this modern kitchen gadget. From its creamy texture to its customizable options, this recipe offers endless possibilities for dessert lovers. Beyond its delicious taste, the Oreo Ninja Creami recipe represents a perfect blend of nostalgia and innovation. It brings together the comforting familiarity of Oreos with the excitement of creating something new and personalized. Whether you're looking to impress guests at your next gathering or simply craving a sweet treat to brighten your day, this recipe offers a solution that's both practical and delightful. Plus, with its straightforward preparation process, you can enjoy restaurant-quality ice cream from the comfort of your own kitchen.
Table of Contents
- What Makes the Oreo Ninja Creami Recipe So Special?
- Essential Ingredients and Tools for Your Creami Adventure
- Step-by-Step Guide to Making the Perfect Oreo Creami
- How Can You Customize Your Oreo Ninja Creami?
- Troubleshooting Common Creami Challenges
- Why Does the Ninja Creami Produce Such Creamy Results?
- Serving Suggestions and Pairing Ideas
- Frequently Asked Questions About the Oreo Creami Recipe
What Makes the Oreo Ninja Creami Recipe So Special?
The Oreo Ninja Creami recipe stands out in the world of homemade ice cream for several compelling reasons. First and foremost, it combines the universally loved flavor profile of Oreos with the cutting-edge technology of the Ninja Creami appliance. This unique pairing results in a dessert that captures the essence of traditional ice cream while offering a fresh, modern twist. The recipe's versatility is particularly noteworthy – you can adjust sweetness levels, experiment with different Oreo varieties, and even incorporate additional mix-ins to create a truly personalized treat. When compared to traditional ice cream making methods, the Oreo Ninja Creami recipe offers several distinct advantages. Unlike conventional churn-based systems, the Ninja Creami utilizes a revolutionary freezing and blending process that eliminates the need for rock salt or lengthy churning sessions. This not only simplifies the preparation but also allows for greater control over texture and consistency. The result is an ice cream that's consistently smooth and creamy, without the ice crystals often found in homemade versions made with traditional methods. The popularity of this recipe among dessert enthusiasts stems from its perfect balance of convenience and customization. Home cooks appreciate how the Ninja Creami transforms basic ingredients into gourmet-quality ice cream in a matter of hours. Moreover, the Oreo element adds a nostalgic factor that appeals to both children and adults alike. The recipe's success has sparked numerous variations and adaptations, creating a vibrant community of Creami users who share tips and modifications, further enhancing the recipe's appeal and versatility.
Essential Ingredients and Tools for Your Creami Adventure
Creating the perfect Oreo Ninja Creami requires careful attention to both ingredients and equipment. At the heart of this recipe lies the classic Oreo cookie, but not all Oreos are created equal. For the best results, use standard Original Oreos rather than Double Stuf or flavored varieties, as their balanced cookie-to-cream ratio provides optimal texture and flavor distribution. You'll need approximately 12-15 cookies, depending on your desired intensity of Oreo flavor. For the cream base, heavy whipping cream (at least 35% fat content) is essential, as it provides the necessary fat content for a rich, creamy texture. Whole milk complements the cream, while granulated sugar adds sweetness without altering the texture. The Ninja Creami itself is naturally the star of your equipment lineup, but several other tools will enhance your ice cream-making experience. A digital kitchen scale ensures precise measurements, particularly important when balancing the fat and sugar content for optimal freezing. A high-quality silicone spatula helps you scrape every bit of mixture from your containers, maximizing yield and preventing waste. For breaking down Oreos, a food processor works wonders, though a zip-top bag and rolling pin can serve as an effective alternative. Additionally, a set of airtight containers specifically designed for the Creami's pint-sized capacity will help maintain proper freezing conditions during the preparation process. Temperature control plays a crucial role in achieving the perfect consistency. All ingredients should be thoroughly chilled before mixing, ideally refrigerating them for at least two hours prior to preparation. This pre-chilling process helps the mixture reach its freezing point more efficiently. When it comes to sugar content, maintaining a ratio of approximately 1/3 cup of sugar per pint of mixture ensures proper texture without making the ice cream overly sweet. Equally important is the fat content – the combination of heavy cream and whole milk should make up about 60% of your liquid ingredients to achieve that luxurious, scoopable texture that makes the Oreo Ninja Creami so irresistible.
Read also:Unlock The Power Of S Free A Comprehensive Guide To Freedom And Flexibility
Step-by-Step Guide to Making the Perfect Oreo Creami
Preparing Your Base Mixture
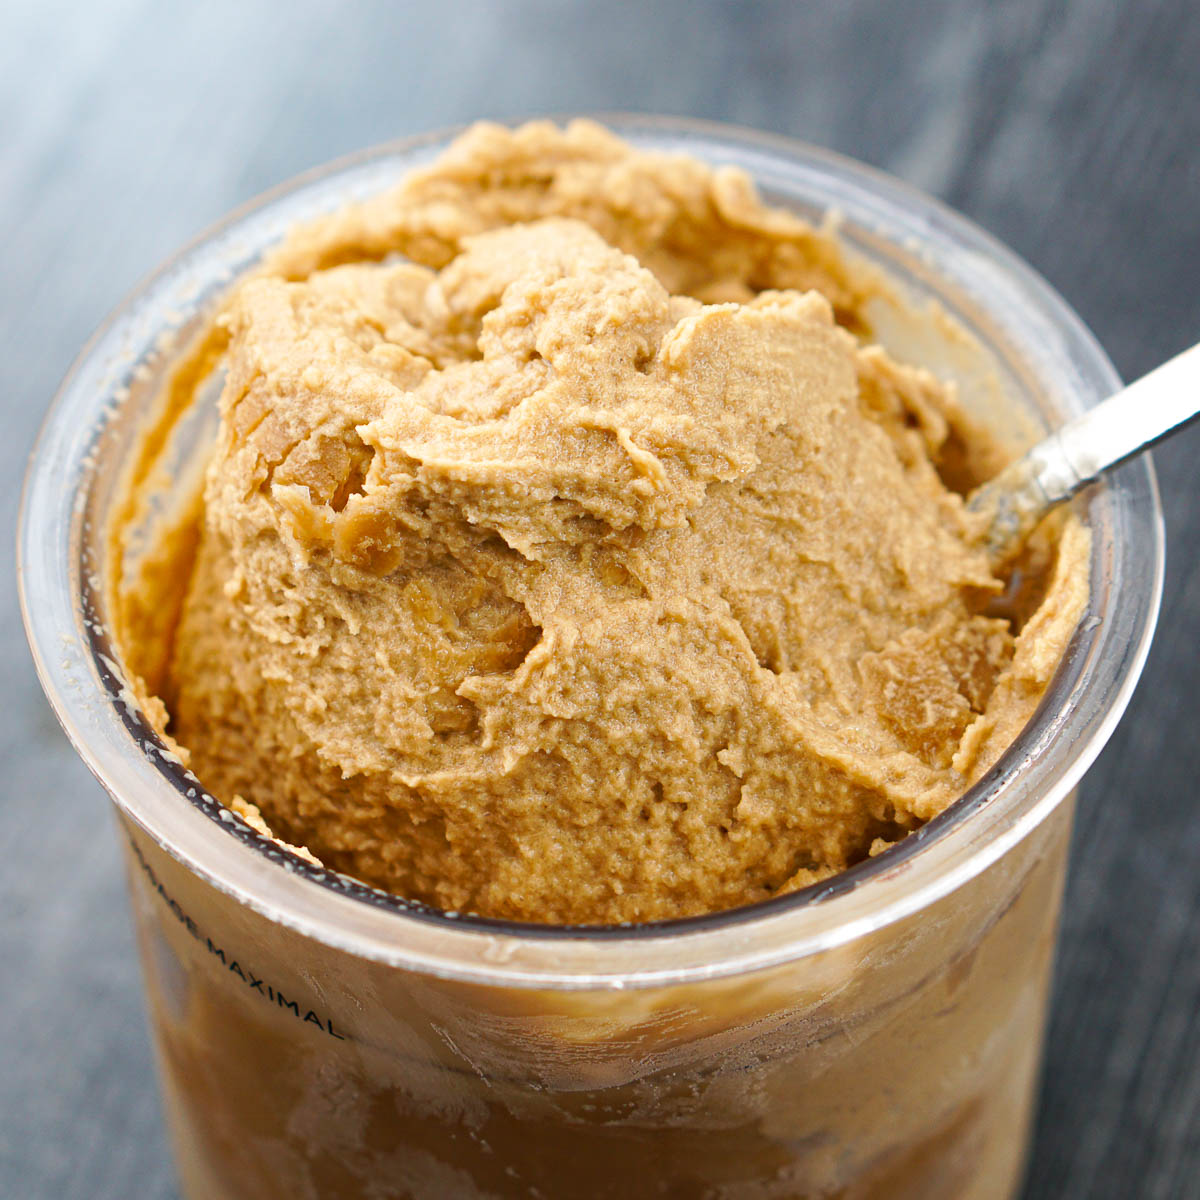
The foundation of your Oreo Ninja Creami begins with careful preparation of the base mixture. Start by separating 12-15 Oreos into two portions: one for crushing and another for chunk inclusion. Using a food processor, pulse half of the cookies until they reach a fine crumb consistency, being careful not to over-process into a powder. In a large mixing bowl, combine 1 cup of heavy whipping cream, 1 cup of whole milk, and 1/3 cup of granulated sugar. Whisk these ingredients vigorously for 2-3 minutes until the sugar dissolves completely and the mixture begins to thicken slightly. Gradually fold in the crushed Oreos, ensuring even distribution throughout the liquid base. This process helps infuse the mixture with Oreo flavor while maintaining distinct cookie pieces for texture.
The Freezing Process Explained
Once your base mixture is prepared, pour it into the Ninja Creami pint container, leaving about 1/2 inch of space at the top for expansion. Seal the container tightly and place it in your freezer for a minimum of 24 hours. This extended freezing period is crucial for achieving the proper consistency before the churning phase. After the initial freeze, remove the container and let it sit at room temperature for exactly 5 minutes – this brief thawing period helps prevent ice crystals during the churning process. Insert the container into the Ninja Creami, selecting the "Ice Cream" setting for your first churn. If the mixture doesn't reach your desired consistency after the first cycle, simply return it to the freezer for 30-60 minutes before running it through a second churn cycle. This two-step freezing process ensures a consistently smooth texture that rivals professional ice cream.
How Can You Customize Your Oreo Ninja Creami?
The beauty of the Oreo Ninja Creami recipe lies in its remarkable versatility, offering endless possibilities for personalization. For flavor variations, consider experimenting with different Oreo varieties such as Golden, Chocolate Peanut Butter, or Mint. Each type brings its unique twist to the classic recipe, transforming the base into entirely new taste experiences. You can also incorporate additional flavor extracts like vanilla bean, almond, or peppermint to complement the Oreo base. For a more sophisticated touch, try adding a teaspoon of instant espresso powder to create a mocha-Oreo fusion that's sure to impress adult palates. Texture modifications offer another dimension of customization. For a chunkier experience, reserve whole or halved Oreos to mix in after the initial churning process. Alternatively, create a ripple effect by swirling in homemade chocolate or caramel sauce during the final minutes of churning. For those seeking a lighter option, substitute half of the heavy cream with Greek yogurt or coconut cream, maintaining creaminess while reducing fat content. Nut lovers can add crushed peanuts, almonds, or pecans for added crunch, while fruit enthusiasts might consider incorporating fresh berries or banana slices for a refreshing contrast to the rich cookie flavor. Seasonal adaptations present exciting opportunities to keep your Oreo Ninja Creami creations fresh and exciting throughout the year. During summer months, incorporate fresh fruits like strawberries or peaches for a refreshing twist. Fall brings the perfect opportunity to add pumpkin spice or cinnamon for a warm, cozy flavor profile. Winter holidays can inspire peppermint-infused versions or red and green colored variations using natural food coloring. Spring celebrations might call for pastel-colored mix-ins or floral-inspired additions like lavender extract. Each seasonal variation not only keeps your dessert repertoire exciting but also allows you to create special memories and traditions through your customized Oreo Ninja Creami creations.
Troubleshooting Common Creami Challenges
Even experienced home cooks may encounter challenges when working with the Ninja Creami. One frequent issue involves the mixture remaining too soft after churning. This typically occurs when the initial freezing period isn't long enough or if the freezer temperature isn't consistently below 0°F (-18°C). To address this, extend the initial freezing time by an additional 4-6 hours and verify your freezer's temperature settings. Another common problem is the formation of ice crystals, which can result from opening the freezer door too frequently during the freezing process or not allowing sufficient time for the mixture to freeze completely. Texture inconsistencies often stem from improper mixing techniques or incorrect ingredient ratios. If your ice cream turns out grainy, it's likely due to undissolved sugar particles. To prevent this, ensure you whisk the base mixture thoroughly and consider warming the sugar slightly before adding it to the cream mixture. For overly icy results, increase the fat content by using a higher ratio of heavy cream to milk, or add a tablespoon of corn syrup to lower the freezing point. When dealing with flavor intensity issues, remember that flavors become more muted when frozen. To compensate, increase your base flavoring by about 25% or add a small amount of salt to enhance the Oreo taste. Equipment-related challenges can also impact your results. If the Creami isn't churning properly, check that the pint container is positioned correctly and that the lid is securely fastened. Ensure the machine's blades are clean and free of any dried mixture from previous uses. For persistent texture issues, consider calibrating your Creami according to the manufacturer's instructions or contacting customer support for technical assistance. Remember that ambient temperature and humidity can affect results, so try to work in a consistently cool environment and avoid making ice cream on particularly warm or humid days.
Why Does the Ninja Creami Produce Such Creamy Results?
The Ninja Creami's exceptional performance in creating creamy ice cream stems from its innovative approach to freezing and churning. Unlike traditional ice cream makers that rely solely on continuous churning during freezing, the Ninja Creami employs a two-stage process that optimizes both temperature control and air incorporation. During the initial freezing phase, the mixture solidifies uniformly without incorporating air, preventing the formation of large ice crystals that typically make homemade ice cream grainy. This solid block of frozen mixture then undergoes precise churning at controlled temperatures, allowing for optimal air incorporation while maintaining a stable fat structure. The science behind this process involves careful manipulation of the ice cream's physical properties. The rapid churning action breaks down ice crystals while simultaneously incorporating air bubbles, creating a matrix of fat globules that trap these air cells. This results in a dense yet creamy texture that's free from the icy consistency often associated with homemade ice cream. The appliance's powerful motor and specially designed blades work in tandem to achieve this texture transformation in minutes, a process that traditionally takes hours with conventional methods. When compared to store-bought ice cream, the Ninja Creami offers several distinct advantages. Commercial ice cream often contains stabilizers and emulsifiers to maintain texture during storage and transportation, which can affect flavor purity. The Ninja Creami eliminates the need for these additives by creating a fresh product that's consumed immediately after preparation. Additionally, the ability to