For owners of the 1978 Ford F150, the fuse box diagram serves as a roadmap to the truck's electrical architecture. Whether you're restoring a vintage model or simply performing routine maintenance, knowing the layout and function of each fuse can save you time and money. This guide delves into the specifics of the fuse box diagram, offering insights into its design, common issues, and practical solutions. With this knowledge, you'll be better equipped to handle electrical challenges and keep your classic truck running smoothly. The 1978 Ford F150 fuse box diagram is more than just a technical illustration; it's a testament to the engineering prowess of its time. As vehicles from this era become increasingly rare, preserving their functionality becomes all the more important. By understanding the fuse box diagram, you contribute to the preservation of automotive history while ensuring that your truck remains a reliable companion on the road. In the sections that follow, we will explore the diagram's details, address frequently asked questions, and provide actionable advice for maintaining your F150's electrical system.
- What is the 1978 Ford F150 Fuse Box Diagram?
- How Does the Fuse Box Work in the 1978 Ford F150?
- Common Issues with the 1978 Ford F150 Fuse Box
- How to Read the 1978 Ford F150 Fuse Box Diagram?
- Step-by-Step Guide to Replacing a Fuse
- Tools and Materials Needed for Fuse Box Maintenance
- Why is the Fuse Box Diagram Important for Restoration Projects?
- Frequently Asked Questions About the 1978 Ford F150 Fuse Box
What is the 1978 Ford F150 Fuse Box Diagram?
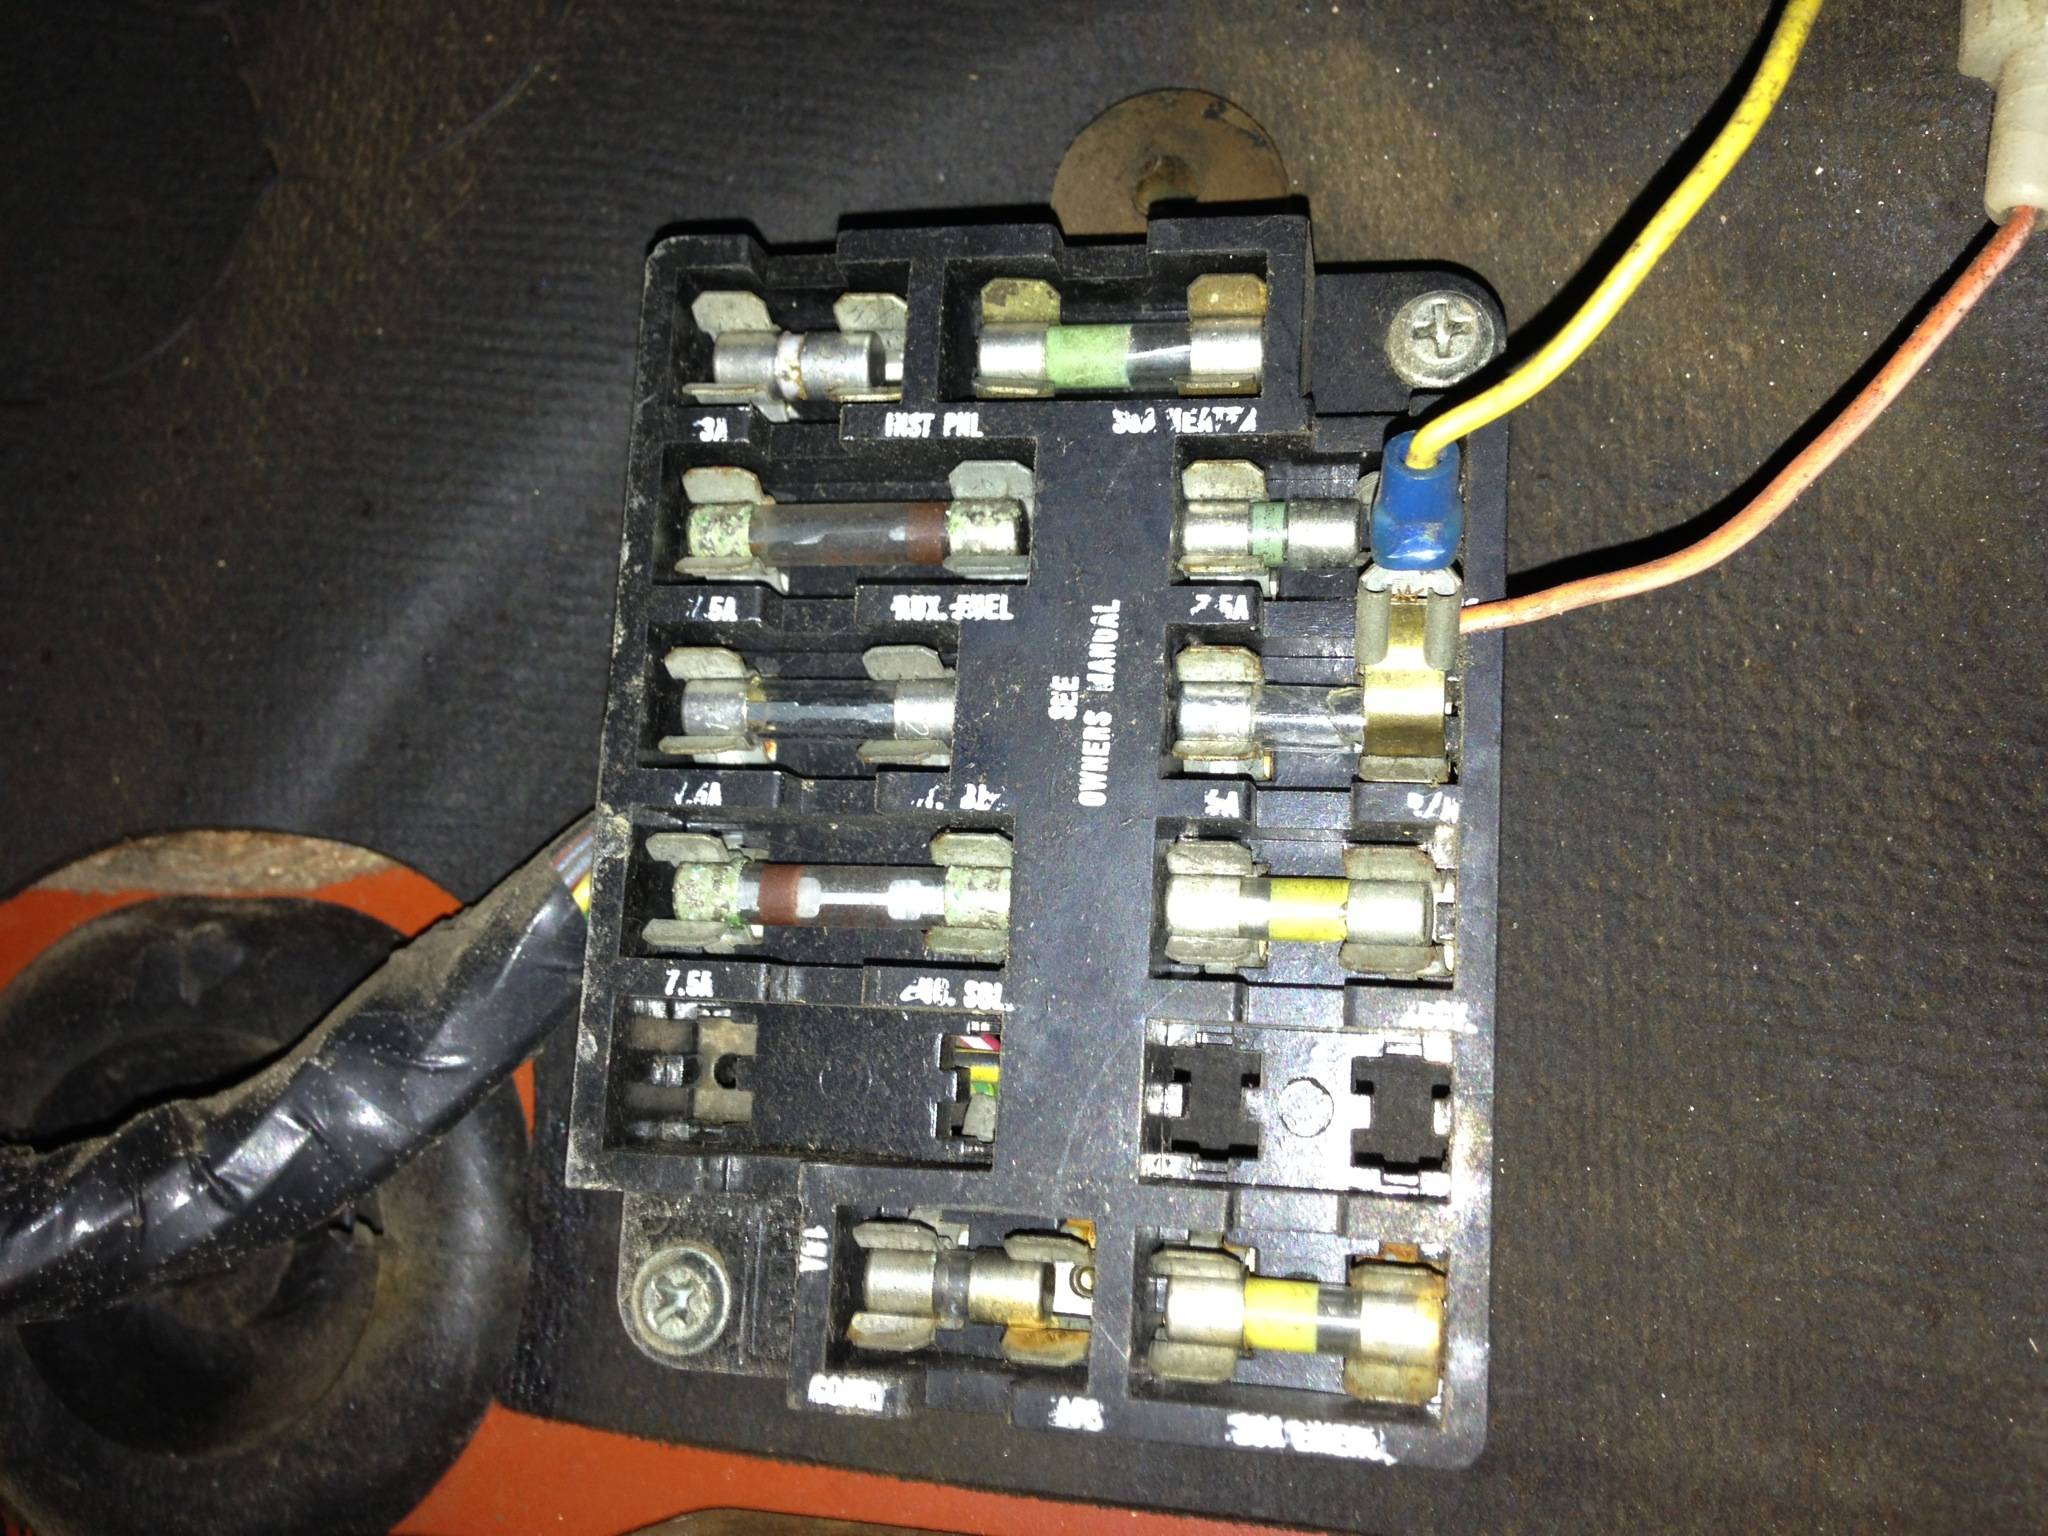
The 1978 Ford F150 fuse box diagram is a detailed schematic that illustrates the arrangement and function of each fuse within the vehicle's electrical system. Designed to protect the truck's wiring and components from electrical overloads, the fuse box plays a critical role in ensuring the safe operation of the vehicle. Each fuse corresponds to a specific electrical circuit, such as the lighting system, ignition, or accessories, and is rated to handle a particular amount of current. By referring to the diagram, owners can quickly identify which fuse controls which component, making troubleshooting and repairs more efficient. The layout of the 1978 Ford F150 fuse box diagram typically includes a labeled illustration of the fuse panel, with each fuse marked by its amperage rating and corresponding function. For instance, a 20-amp fuse might be responsible for the windshield wipers, while a 15-amp fuse could control the interior lighting. Understanding these designations is crucial for diagnosing electrical problems. If a fuse blows, the diagram allows you to pinpoint the affected circuit and replace the fuse without guesswork. In addition to its practical utility, the fuse box diagram also reflects the engineering standards of the late 1970s. During this period, automotive manufacturers were increasingly focused on improving vehicle safety and reliability. The fuse box in the 1978 Ford F150 exemplifies this commitment, providing a robust and organized system for managing electrical loads. By studying the diagram, enthusiasts gain insight into the design principles that made the F150 a trusted workhorse for decades.
How Does the Fuse Box Work in the 1978 Ford F150?
To fully appreciate the 1978 Ford F150 fuse box diagram, it's important to understand how the fuse box functions within the vehicle's electrical system. At its core, the fuse box acts as a protective barrier, shielding the truck's wiring and components from electrical surges that could cause damage or even fire. Each fuse is essentially a thin wire encased in a plastic or glass housing, designed to break the circuit if the current exceeds its rated capacity. This mechanism prevents excessive current from reaching sensitive components, thereby safeguarding the vehicle's electrical integrity. The 1978 Ford F150 fuse box is typically located under the dashboard on the driver's side, though some models may have an additional fuse panel in the engine compartment. Each fuse is inserted into a designated slot, with its position corresponding to a specific circuit. When a circuit experiences an overload—such as a short circuit or a malfunctioning component—the fuse will "blow," interrupting the flow of electricity. This immediate response prevents further damage and allows the owner to address the underlying issue. Understanding the operation of the fuse box is particularly important for maintaining the 1978 Ford F150. Electrical problems are a common concern in older vehicles, often stemming from worn-out wiring or corroded connections. By regularly inspecting the fuse box and referring to the 1978 Ford F150 fuse box diagram, owners can identify potential issues before they escalate. This proactive approach not only extends the life of the vehicle but also ensures a safer driving experience.
Read also:Hayes Macarthur Wife A Complete Guide To Their Love Story And Life Together
Common Issues with the 1978 Ford F150 Fuse Box
Despite its robust design, the 1978 Ford F150 fuse box is not immune to problems, especially given the vehicle's age. Over time, wear and tear can lead to a variety of electrical issues that may require attention. Below, we explore two of the most common challenges associated with the fuse box and their potential causes.
Blown Fuses and Their Causes
Blown fuses are perhaps the most frequent issue encountered by owners of the 1978 Ford F150. A blown fuse occurs when the current flowing through a circuit exceeds the fuse's rated capacity, causing the internal wire to melt and break the circuit. This can happen for several reasons, including:
- Short Circuits: A short circuit occurs when a live wire comes into contact with a ground wire or a metal component, creating an unintended path for electricity. This can overload the circuit and cause the fuse to blow.
- Overloaded Circuits: Adding aftermarket accessories, such as high-powered stereo systems or auxiliary lights, can place excessive strain on a circuit, leading to blown fuses.
- Aging Wiring: The insulation on wires can degrade over time, exposing the conductive material and increasing the risk of electrical faults.
To address blown fuses, it's essential to identify and resolve the root cause. Simply replacing the fuse without addressing the underlying issue may result in repeated failures. The 1978 Ford F150 fuse box diagram can be a valuable tool in this process, helping you trace the affected circuit and locate potential problem areas.
Corrosion and Electrical Problems
Corrosion is another common issue that can compromise the performance of the 1978 Ford F150 fuse box. Over time, moisture and humidity can seep into the fuse panel, causing rust and oxidation to form on the metal contacts. This corrosion can interfere with the flow of electricity, leading to intermittent electrical failures or complete loss of function in certain components. To prevent corrosion, it's important to keep the fuse box clean and dry. Regular inspections can help you spot early signs of rust or moisture buildup, allowing you to take corrective action before the problem worsens. Applying a dielectric grease to the fuse contacts can also provide an additional layer of protection against moisture. By maintaining the integrity of the fuse box, you ensure that your 1978 Ford F150 remains reliable and safe to drive.
How to Read the 1978 Ford F150 Fuse Box Diagram?
Interpreting the 1978 Ford F150 fuse box diagram may seem daunting at first, but with a systematic approach, it becomes a straightforward task. The diagram is essentially a map that guides you through the fuse panel, providing critical information about each fuse's location, amperage rating, and corresponding function. To begin, locate the diagram, which is often found in the vehicle's owner's manual or on the inside cover of the fuse box itself. If you don't have access to these resources, you can find a reliable 1978 Ford F150 fuse box diagram online. Start by familiarizing yourself with the layout of the fuse panel. The diagram will typically display a grid-like arrangement, with each fuse slot numbered or labeled for easy identification. Next, note the amperage rating of each fuse, which is usually indicated by a number followed by the letter "A" (e.g., 15A for a 15-amp fuse). This rating tells you the maximum current the fuse can handle before it blows. Understanding these ratings is crucial for selecting the correct replacement fuse. Once you've identified the fuses and their ratings, examine the corresponding functions listed on the diagram. For example, a fuse labeled "H/L" likely controls the headlights, while one marked "W/S" may be responsible for the windshield wipers. By cross-referencing the diagram with the actual fuse panel, you can quickly locate the fuse associated with a malfunctioning component. This process not only simplifies troubleshooting but also ensures that you replace the correct fuse, minimizing the risk of further electrical issues.
Step-by-Step Guide to Replacing a Fuse
Replacing a blown fuse in the 1978 Ford F150 is a straightforward process, but it requires attention to detail to ensure safety and accuracy. Follow these steps to complete the task efficiently:
Read also:Inside The Life Of Jose Cansecos Wife An Insightful Look At Her Journey
- Turn Off the Vehicle: Before working on the fuse box, ensure the vehicle is turned off and the key is removed from the ignition. This prevents the risk of electrical shock or short circuits while handling the fuses.
- Locate the Fuse Box: Refer to the 1978 Ford F150 fuse box diagram to identify the location of the fuse panel. In most cases, it will be found under the dashboard on the driver's side, but some models may have an additional fuse box in the engine compartment.
- Identify the Blown Fuse: Using the diagram, locate the fuse associated with the malfunctioning component. A blown fuse can often be identified by a broken wire visible through the plastic housing or a darkened appearance.
- Remove the Fuse: Use a fuse puller, which is typically included in the vehicle's toolkit, or a pair of needle-nose pliers to carefully extract the blown fuse from its slot. Avoid using excessive force to prevent damage to the fuse panel.
- Install the Replacement Fuse: Select a new fuse with the same amperage rating as the one you removed. Insert it firmly into the empty slot, ensuring it is properly seated. Refer to the diagram to confirm the correct placement.
- Test the Component: Turn the vehicle back on and test the component that was malfunctioning. If it operates correctly, the replacement was successful. If the issue persists, further troubleshooting may be necessary.
By following these steps, you can confidently replace a blown fuse in your 1978 Ford F150, restoring functionality to your vehicle's electrical system.
Tools and Materials Needed for Fuse Box Maintenance
Maintaining the 1978 Ford F150 fuse box requires