Who doesn’t love a perfectly creamy cheesecake that’s quick to prepare and even quicker to devour? With Keebler’s ready crust, making a cheesecake has never been easier. This pre-made crust eliminates the hassle of baking and shaping your own base, allowing you to focus on crafting the rich, velvety filling that everyone craves. Whether you’re a seasoned baker or a kitchen novice, this cheesecake Keebler ready crust recipe will guide you through every step, ensuring a dessert that’s as delightful to make as it is to eat.
Imagine serving a dessert that not only looks professional but also tastes divine, all with minimal effort. Keebler’s ready crust is the secret weapon you’ve been searching for, providing a buttery, crumbly foundation that pairs beautifully with any cheesecake filling. From classic New York-style to creative seasonal twists, this recipe opens the door to endless possibilities. Let’s dive into the world of effortless baking and uncover how this simple yet versatile ingredient can elevate your dessert game.
As we explore the ins and outs of this cheesecake Keebler ready crust recipe, you’ll discover tips, tricks, and variations to suit every palate. Whether you’re hosting a dinner party or simply craving something sweet, this guide will ensure your cheesecake is the star of the show. So grab your ingredients, preheat your oven (if needed), and get ready to impress with a dessert that’s as easy to make as it is to enjoy.
Read also:Claire Redfield R34 Exploring The Iconic Character And Her Evolution In Gaming
Table of Contents
- What Makes Keebler Ready Crust Unique?
- How to Make the Perfect Cheesecake Filling?
- Can You Customize Your Cheesecake Keebler Ready Crust Recipe?
- Step-by-Step Guide to Assembling Your Cheesecake
- What Are the Best Topping Ideas for Your Cheesecake?
- Common Mistakes to Avoid When Making Cheesecake
- How to Store and Serve Your Cheesecake?
- Frequently Asked Questions About Cheesecake Keebler Ready Crust Recipe
What Makes Keebler Ready Crust Unique?
Keebler’s ready crust stands out as a game-changer in the world of baking, offering convenience without compromising on flavor or quality. Unlike traditional crusts that require precise measurements, mixing, and baking, Keebler’s pre-made crust is ready to use straight out of the box. This buttery, crumbly base is crafted with care, ensuring a consistent texture and taste that pairs beautifully with any cheesecake filling. Its versatility makes it an ideal choice for both classic recipes and creative variations, allowing bakers of all skill levels to achieve professional results.
One of the standout features of Keebler ready crust is its ability to save time without sacrificing quality. For those who love baking but dread the tedious process of preparing a crust from scratch, this product is a lifesaver. The crust is pre-baked and perfectly shaped, eliminating the risk of crumbling or uneven edges. Whether you’re whipping up a dessert for a last-minute gathering or simply craving something sweet, Keebler’s ready crust ensures you can focus on the fun part—creating a delicious filling.
Another advantage of Keebler ready crust is its adaptability. While it’s most commonly associated with cheesecakes, this crust can also be used for pies, tarts, and even no-bake desserts. Its rich, buttery flavor complements a wide range of ingredients, from tangy lemon curd to decadent chocolate mousse. With Keebler ready crust, the possibilities are endless, making it a pantry staple for anyone who loves to bake or experiment in the kitchen.
How to Make the Perfect Cheesecake Filling?
Creating the perfect cheesecake filling is an art that balances creamy textures with rich flavors. The key to achieving this lies in selecting high-quality ingredients and mastering the mixing process. Start with full-fat cream cheese, as it provides the luscious, velvety consistency that defines a classic cheesecake. Allow the cream cheese to come to room temperature before mixing, as this ensures a smooth blend without lumps. Combine it with granulated sugar, a pinch of salt, and pure vanilla extract to enhance the flavor profile.
What Are the Essential Ingredients for Cheesecake Filling?
The foundation of any great cheesecake filling includes a few essential ingredients. First, cream cheese is the star of the show, offering a rich and tangy base. Eggs are another crucial component, as they provide structure and help achieve the desired creamy texture. Heavy cream or sour cream can be added for extra richness and a slight tang, elevating the overall flavor. For sweetness, granulated sugar is a classic choice, but you can experiment with alternatives like honey or maple syrup for a unique twist.
How to Avoid Overmixing Cheesecake Filling?
Overmixing is a common pitfall when preparing cheesecake filling, as it can introduce too much air, leading to cracks during baking. To avoid this, mix the ingredients on low speed until just combined. Begin by blending the cream cheese and sugar until smooth, then add the eggs one at a time, mixing gently after each addition. Incorporate any additional ingredients, like sour cream or flavorings, with minimal stirring to preserve the filling’s creamy texture.
Read also:Discover The Benefits Of Vc Credit Union Your Financial Partner For Life
Once your filling is ready, pour it evenly into the Keebler ready crust. Tap the pan gently on the counter to release any trapped air bubbles, ensuring a smooth surface. Whether you bake the cheesecake or opt for a no-bake version, the filling’s quality will shine through, thanks to your attention to detail and the premium ingredients you’ve chosen.
Can You Customize Your Cheesecake Keebler Ready Crust Recipe?
A cheesecake Keebler ready crust recipe is a blank canvas, offering endless opportunities for customization. Whether you’re catering to dietary preferences, experimenting with flavors, or adding a personal touch, the versatility of this recipe ensures there’s something for everyone. From gluten-free options to bold flavor combinations, customizing your cheesecake allows you to create a dessert that’s uniquely yours.
What Are Some Flavor Variations to Try?
One of the easiest ways to customize your cheesecake is by experimenting with different flavor profiles. For a fruity twist, fold in fresh berries like strawberries, blueberries, or raspberries into the filling. Alternatively, swirl in a layer of fruit preserves, such as cherry or apricot, for a vibrant burst of color and taste. If you’re a fan of chocolate, consider adding cocoa powder to the filling or drizzling melted chocolate on top for a decadent finish. For a more exotic touch, incorporate ingredients like mango puree, passionfruit juice, or even a hint of matcha powder.
How to Make a Gluten-Free Cheesecake Keebler Ready Crust Recipe?
For those with gluten sensitivities, Keebler offers gluten-free ready crust options that are just as delicious as their traditional counterparts. Simply pair the gluten-free crust with your favorite cheesecake filling, ensuring all other ingredients are also gluten-free. For example, use gluten-free graham crackers or almond flour if you’re making your own crust variation. This small adjustment allows everyone to enjoy the creamy goodness of cheesecake without compromising on taste or texture.
Another way to personalize your cheesecake is by playing with textures. Add a layer of crunchy toppings like crushed nuts, cookie crumbs, or toffee bits for a delightful contrast to the smooth filling. You can also experiment with spices like cinnamon, nutmeg, or cardamom to infuse warmth and depth into your dessert. With so many options to explore, your cheesecake Keebler ready crust recipe can be as unique as your imagination allows.
Step-by-Step Guide to Assembling Your Cheesecake
Assembling a cheesecake using a Keebler ready crust is a straightforward process that even beginners can master. By following a few simple steps, you can ensure your dessert turns out perfectly every time. Begin by preparing your filling, ensuring all ingredients are at room temperature for a smooth blend. Once your filling is ready, gently spoon it into the pre-made crust, spreading it evenly with a spatula to create a level surface.
Next, tap the pan lightly on the counter to release any air bubbles trapped in the filling. This step is crucial for achieving a smooth, crack-free cheesecake. If you’re adding toppings or swirls, now is the time to do so. For a classic look, sprinkle a handful of crushed cookies or drizzle caramel sauce over the top. For a more artistic touch, use a toothpick to create intricate swirl patterns with fruit preserves or melted chocolate.
After assembling your cheesecake, decide whether to bake it or chill it. For baked versions, preheat your oven to the recommended temperature and place the cheesecake in a water bath to prevent cracking. Bake until the edges are set but the center is slightly jiggly, then allow it to cool completely before refrigerating. For no-bake options, simply chill the cheesecake in the refrigerator for at least four hours or overnight. With these steps, your cheesecake Keebler ready crust recipe will be ready to impress.
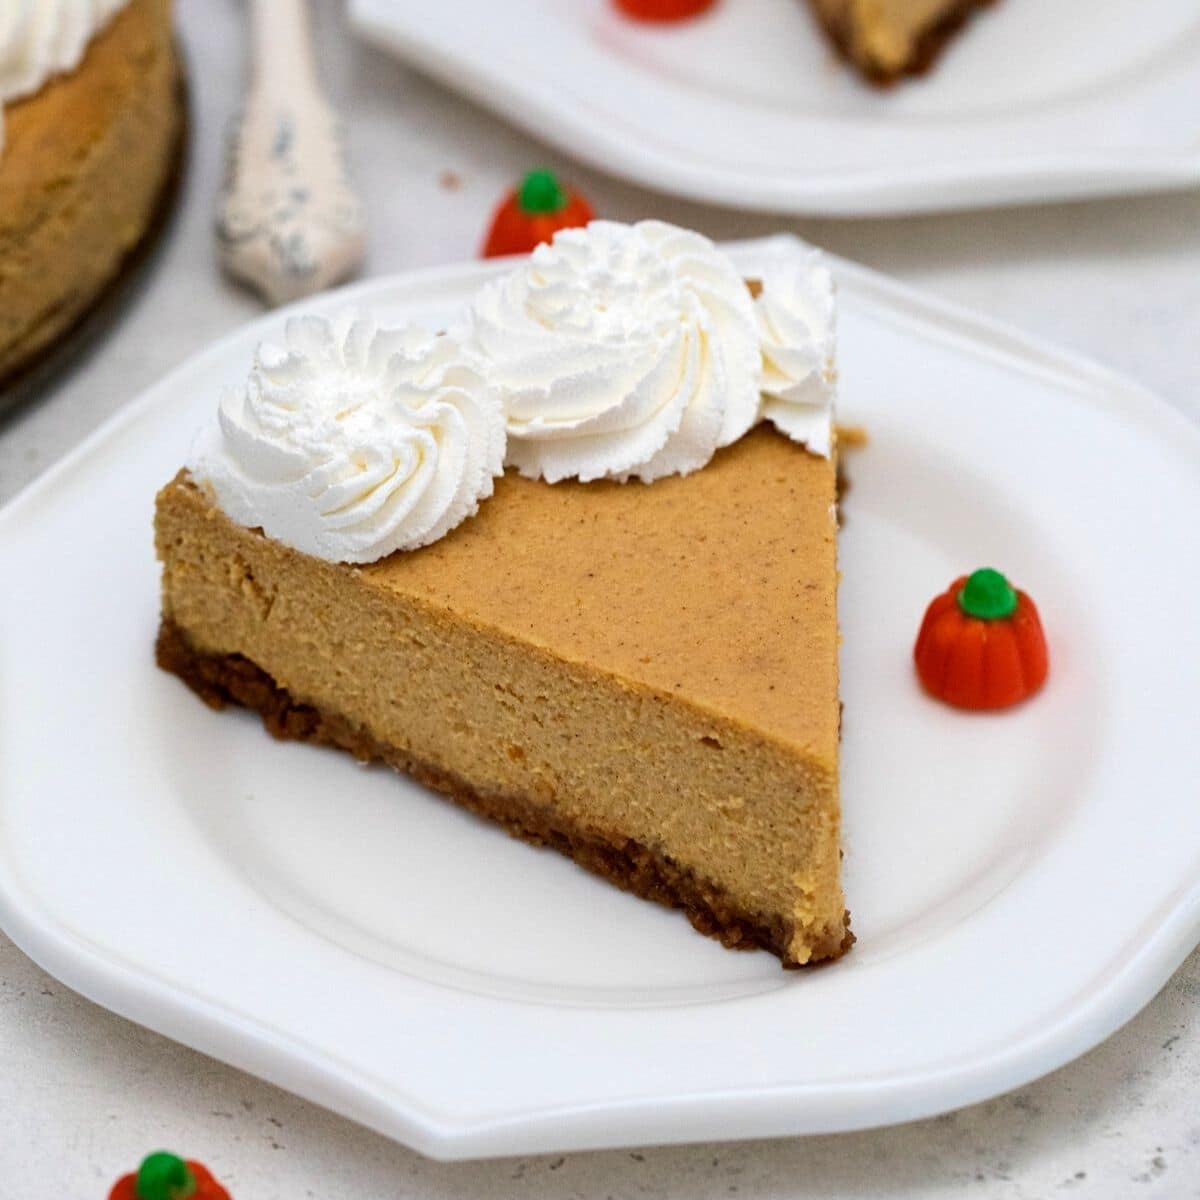
What Are the Best Topping Ideas for Your Cheesecake?
The right toppings can elevate your cheesecake Keebler ready crust recipe from delicious to unforgettable. Whether you’re aiming for a classic presentation or something more adventurous, the topping options are endless. Fresh fruit is a timeless choice, offering both vibrant colors and refreshing flavors. Consider arranging sliced strawberries, kiwis, or blueberries in a decorative pattern for a visually appealing finish. A dollop of whipped cream adds a light, airy contrast to the rich cheesecake filling.
For those with a sweet tooth, indulgent toppings like caramel sauce, chocolate ganache, or crushed candy bars are sure to delight. Drizzle these generously over the cheesecake for a decadent treat. Alternatively, sprinkle crushed cookies, nuts, or toasted coconut flakes for added texture and flavor. If you’re feeling creative, try combining multiple toppings, such as a layer of fruit preserves topped with a sprinkle of crushed pistachios or a dusting of cocoa powder.
Seasonal ingredients can also inspire unique topping ideas. During the fall, consider a pumpkin spice glaze or candied pecans for a festive touch. In the summer, fresh berries and a sprig of mint make for a refreshing combination. No matter which toppings you choose, they should complement the creamy filling and buttery crust, creating a harmonious balance of flavors and textures.
Common Mistakes to Avoid When Making Cheesecake
Even with a foolproof cheesecake Keebler ready crust recipe, certain pitfalls can affect the final outcome. One of the most frequent mistakes is overbaking the cheesecake, which can lead to a dry and cracked surface. To avoid this, bake the cheesecake until the edges are set but the center remains slightly jiggly. This ensures a creamy texture once the dessert is fully chilled. Another common error is failing to bring ingredients to room temperature before mixing, which can result in lumpy filling. Always allow your cream cheese, eggs, and other components to sit out for at least 30 minutes before preparation.
Improper cooling is another issue that can impact your cheesecake’s appearance and texture. After baking, let the cheesecake cool gradually at room temperature before transferring it to the refrigerator. Placing it directly in the fridge while still warm can cause condensation, leading to a soggy crust. Additionally, skipping a water bath for baked cheesecakes can result in cracks due to uneven heat distribution. By addressing these common mistakes, you can ensure your cheesecake Keebler ready crust recipe turns out perfectly every time.
How to Store and Serve Your Cheesecake?
Proper storage and serving techniques are essential to maintaining the quality of your cheesecake Keebler ready crust recipe. Once your cheesecake has chilled and set, cover it tightly with plastic wrap or transfer it to an airtight container to prevent it from absorbing odors from the refrigerator. It can be stored for up to five days, but for the best taste and texture, consume it within the first two to three days. If you need to store it longer, consider freezing individual slices wrapped in parchment paper and sealed in a freezer-safe bag for up to two months.
When it’s time to serve, remove the cheesecake from the refrigerator about 15–20 minutes beforehand to allow it to reach room temperature. This enhances the flavors and ensures a